
Motion Detector with Photo Capture Using Raspberry Pi

Introduction
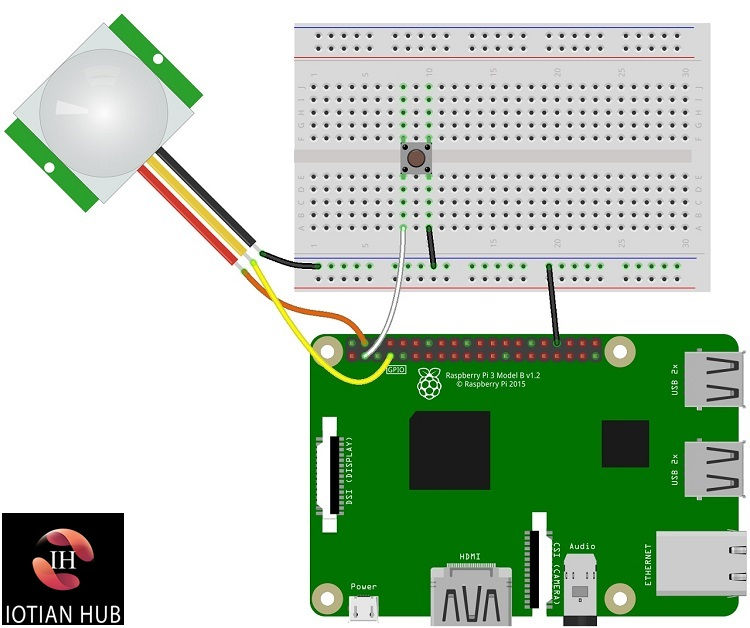
The circuit for this project consists of a PIR motion sensor, a pushbutton, and a camera module you’ll connect to your Pi. The pushbutton is an extra component that allows you to stop the Python script.
To program the Raspberry Pi we’ll be using a Python script and the built
in picamera library, which makes it very simple to control the camera. To control the GPIOs we’ll be using the gpiozero library that contains classes for most popular components like pushbuttons, LEDs, motion sensor, etc.
Parts Required
Step 1 - Enable the Camera
You need to enable your Raspberry Pi’s camera software before you can use the camera module.
In the desktop environment, go to the main menu and select Preferences > Raspberry Pi Configuration. Select the Interfaces tab and a window as shown below should open.(Shown in figure 1)
Step 2 - Connect the Camera
With the camera software enabled, shut down your Pi and then connect the camera to the CSI port. Make sure the camera is connected with the blue letters facing up and oriented as shown in the following figure. Then start up your Pi again.
Circuit Diagram
With the camera connected, follow the next schematic diagram to wire the rest of the circuit.(Shown in figure 2)
-
Pushbutton: GPIO 2
-
PIR motion sensor: GPIO 4
Note: the PIR motion sensor we’re using in this project should be powered using the 5V pin. Other sensors required 3.3V to operate.
Code
#import the necessary packages
from gpiozero import Button, MotionSensor
from picamera import PiCamera
from time import sleep
from signal import pause
#create objects that refer to a button,
#a motion sensor and the PiCamera
button = Button(2)
pir = MotionSensor(4)
camera = PiCamera()
#start the camera
camera.rotation = 180
camera.start_preview()
#image image names
i = 0
#stop the camera when the pushbutton is pressed
def stop_camera():
camera.stop_preview()
#exit the program
exit()
#take photo when motion is detected
def take_photo():
global i
i = i + 1
camera.capture('/home/pi/Desktop/image_%s.jpg' % i)
print('A photo has been taken')
sleep(10)
#assign a function that runs when the button is pressed
button.when_pressed = stop_camera
#assign a function that runs when motion is detected
pir.when_motion = take_photo
pause()
Conclusion
If your’re using Python IDLE to write your code, press F5 or go to Run > Run Module to run the script. While the script is running, you should see a preview of what the camera sees on your screen. To shut down the camera preview, press the pushbutton and click OK in the window that pops up.
Alternatively, in the Terminal window you can type:
pi@raspberrypi:~ $ python3 burglar_detector.py
Congratulations, you project is ready to detect motion and take some photos. You can place this project in a strategic place and come back later to check any saved photos. The following figure shows a photo taken by this project.

Camera Setting
Circuit Diagram