
Home automation using Thinger io
Home automation using Thinger io
In this tutorial, We tell you about home automation device which is done by NodeMCU and others components. This IoT device control home appliances like Fan, light etc through Thinger io web and also smartphone app.
This device make easy your life because you don’t need to go near switch only you take your android phone in your hand and open thinger io application and ON/OFF appliances which you want.
In this home automation, we are using WiFi based automation by using that you can control your fan, lights and other appliances using web, smartphone app. So, using this you are going to save energy and cost. You can also use this one as a iot light alarm for setting the schedule of light ON/OFF.
Hardware Required
1. Esp8266 NodeMCU
It’s Microcontroller to control whole process which is happening this system.
2. Relay Module(5V)
Relay is used as switch it control signals which coming appliances side.
3. HiLink Adapter
Hilink adapter used for convert AC(220V) power supply to DC(5V) power supply.
Software Required
1. Arduino IDE
It's a platform to code NodeMCU.
2. Thinger io
It’s platform which is control NodeMCU.
Circuit Diagram:
Circuit diagram shown in figure1.2
Pin Connection
Resource Nodemcu Relay
GND GND GND
5 V 3V3 VCC
Relay1 D0 IN
Relay2 D1 IN
Note:- To complete this project thinger io account is complsury. Click for see (video1.1) which is given below to create thinger io account and follow these steps.
Code for Home automation system(Download)
// libraries for function of thinger io
#include <ThingerESP8266.h>
// Username, Device ID and Device credential all things are compulsory to the connect device to
thinger io
#define USERNAME "Thinger io Username"
#define DEVICE_ID "Device id"
#define DEVICE_CREDENTIAL "Device Credential"
// Here replace your ssid and password to provide network for NodeMCU
#define SSID "Your SSID "
#define SSID_PASSWORD "Your Password"
ThingerESP8266 thing(USERNAME, DEVICE_ID, DEVICE_CREDENTIAL);
void setup() {
//Define Pin for Output
pinMode(D0, OUTPUT);
pinMode(D1, OUTPUT);
// Start Serial monitor
Serial.begin(9600);
thing.add_wifi(SSID, SSID_PASSWORD);
thing["led1"] << digitalPin(D0);
thing["led2"] << digitalPin(D1);
}
void loop() {
thing.handle();
}
Advantages
● Cost Effective
● Reduce power consumption
● Access anywhere in the world
● Easy to understand.
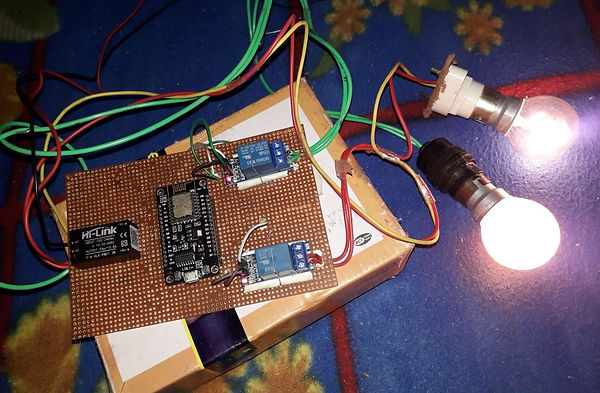
Note:- Final image of the project is shown in figure 1.1

Fig 1.1

Fig1.2