Integration-of-Lora-Technology-with-AWS
- Aaryan Gupta
- Dec 25, 2019
- 3 min read
Updated: Feb 2, 2020
LoRa (short for long range) is a spread spectrum modulation technique derived from chirp spread spectrum (CSS) technology. LoRa Technology is a long range, low power wireless platform that has become the Important technology for Internet of Things (IoT) worldwide. Semtech’s LoRa Technology has amassed over 600 known uses cases for smart cities, smart homes and buildings, smart agriculture, smart metering, smart supply chain and logistics, and more. With 97 million devices connected to networks in 100 countries and growing, LoRa Technology is ,you can say DNA of IoT, creating a Smarter Planet.
some key Features of Lora technology are:--
Long Range
Low Power
Secure
Low Cost
Geolocation
Mobile
High Capacity

Components
Hardware
lora Kit
Dht-11
wires
Software
Node-red
Aws account
The things network Account
Step 2: Configuration of Indoor Lora Wan Gateway
In this tutorial we configure a Indoor Lora Wan Gateway. You can go through this video to configure the gateway
or for more details and for other type of Indoor gateway configuration watch enthu tech channel on youtube.
and the file used in Lg01-p gateway configuration you can download from (here).
Step 3: Step to Send Data to the Things Network Through Lora Device
step-1 create an account on ttn.
step-2 After creating account,go to console.
step-3 create a new gateway ID same as you insert in gateway you configure.
step-4 click on the I'm using the legacy packet tracer.
step-5 Then click on the Indoor antenna placement.
step-6 Now create an application on TTN by going on application and click on add application and then give a application id.
step-7 now select the handler registration the Asia-se.
step-8 now go to your application and then devices and create a new device.
step-9 now go to settings and change the OTAA to ABP and then click on save.
step-10 now you will see app and network key.
step-11 now upload the code to the Arduino Lora Sheild and must take attention that you select the correct frequency Lmic library whatever you write in your Gateway configuration.
step-12 now you will see data on TTN.
step-13 To decode the code ,go to payload and paste the payload code . Get the payload code from here.
Step 4: Integration of Lora to AWS Using Node-red
Step-1 firstly you have to install Node-red in your system.
Step-2 now you have to download ttn palette by going in user settings.
step-3 Now drag and drop the tthuplink form input and double click on it.
step-4 give a new app name and give the acces key from your application overview.
step-5 now drag and drop the function node form function and double click on it and paste the following code as in image or as per your requirement.
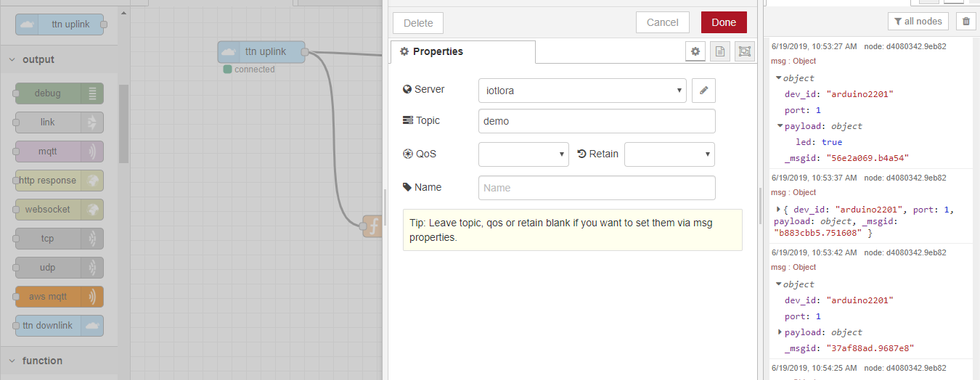
step-6 Now drag and drop the mqtt from output and open it by double click.
step-7 All the necessary documents(which we will find in upcoming steps) upload in this mqtt block click on done.
step-8 Now click on Deploy in Node-red and you will see in Your CMD ,that your ttn is connected with Aws.
Step 5: AWS Integration With Node-red
Step-1 First we have to create an account on Aws which takes 10 to 15 minutes maximum and for first time it takes your credit card details and cut 2 Ru. from your account so do not worry.
step-2 After creating account go to services and then IOT core and then manage.
step-3 Now click on create button and then create a single thing>>Name your thing and then click create.
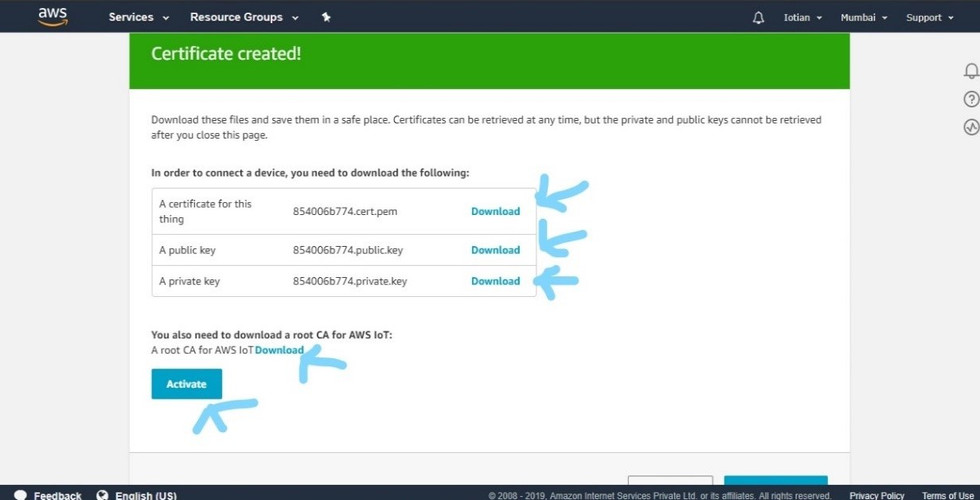
step-4 Now click on Create certificates and download all the certificates and save the root ca-1 file with .pem extension and click on Activate and save all these in a same folder and these are the certificates which you will use in node-red mqtt block.
step-5 Now our thing is ready . Now go to secure>> policies>> click on create.
step-6 Give the name of policy and in action select 'iot*' and in resource arn write '*' and in effects Allow.
step-7 Now go to secure>>certificate and you will see your certificates has been created but not active.
step-8 Click on your certificates and click on action and then attach policy and attach the respective policy which you have created.
step-9 Now go to test and write the mqtt block name which you have drag and drop In node-red and Finally you will see your data on AWS.
Here, Aws all work has been done And You can either store your data on aws and many more services which Aws provides.


Comments