TensorFlow-Object-Detection-on-the-Raspberry-Pi

Introduction--
In this project we set up TensorFlow’s Object Detection API on the Raspberry Pi. By following the steps in this guide, you will be able to use your Raspberry Pi to perform object detection on live video feeds from a Picamera or USB webcam.
Steps--
1. Update the Raspberry Pi
First, the Raspberry Pi needs to be fully updated. Open a terminal and issue:
sudo apt-get update

sudo apt-get dist-upgrade
Depending on how long it’s been since you’ve updated your Pi, the upgrade could take anywhere between a minute and an hour.
2. Install TensorFlow
Next, we’ll install TensorFlow. The download is rather large (over 100MB), so it may take a while. Issue the following command:
pip3 install tensorflowTensorFlow also needs the LibAtlas package. Install it by issuing the following command. (If this command doesn't work, issue "sudo apt-get update" and then try again).
sudo apt-get install libatlas-base-devWhile we’re at it, let’s install other dependencies that will be used by the TensorFlow Object Detection API.
sudo pip3 install pillow lxml jupyter matplotlib cython

sudo apt-get install python-tk
Alright, that’s everything we need for TensorFlow! Next up: OpenCV.
3. Install OpenCV
TensorFlow’s object detection examples typically use matplotlib to display images, but we prefer to use OpenCV because it’s easier to work with and less error prone.
To get OpenCV working on the Raspberry Pi, there’s quite a few dependencies that need to be installed through apt-get. If any of the following commands don’t work, issue “sudo apt-get update” and then try again. Issue:
sudo apt-get install libjpeg-dev libtiff5-dev libjasper-dev libpng12-dev

sudo apt-get install libavcodec-dev libavformat-dev libswscale-dev libv4l-dev

sudo apt-get install libxvidcore-dev libx264-dev

sudo apt-get install qt4-dev-tools libatlas-base-dev
Now that we’ve got all those installed, we can install OpenCV. Issue:
sudo pip3 install opencv-pythonAlright, now OpenCV is installed!
4. Compile and Install Protobuf
The TensorFlow object detection API uses Protobuf, a package that implements Google’s Protocol Buffer data format. You used to need to compile this from source, but now it's an easy install! I moved the old instructions for compiling and installing it from source to the appendix of this guide.
sudo apt-get install protobuf-compiler
Run protoc --version once that's done to verify it is installed. You should get a response of libprotoc 3.6.1 or similar.
5. Set up TensorFlow Directory Structure and PYTHONPATH Variable
Now that we’ve installed all the packages, we need to set up the TensorFlow directory. Move back to your home directory, then make a directory called “tensorflow1”, and cd into it.
mkdir tensorflow1

cd tensorflow1
Download the tensorflow repository from GitHub by issuing:
git clone --depth 1 https://github.com/tensorflow/models.gitNext, we need to modify the PYTHONPATH environment variable to point at some directories inside the TensorFlow repository we just downloaded. We want PYTHONPATH to be set every time we open a terminal, so we have to modify the .bashrc file. Open it by issuing:
sudo nano ~/.bashrcMove to the end of the file, and on the last line, add:
export PYTHONPATH=$PYTHONPATH:/home/pi/tensorflow1/models/research:/home/pi/tensorflow1/models/research/slim
Then, save and exit the file. This makes it so the “export PYTHONPATH” command is called every time you open a new terminal, so the PYTHONPATH variable will always be set appropriately. Close and then re-open the terminal.
Now, we need to use Protoc to compile the Protocol Buffer (.proto) files used by the Object Detection API. The .proto files are located in /research/object_detection/protos, but we need to execute the command from the /research directory. Issue:
cd /home/pi/tensorflow1/models/research

protoc object_detection/protos/*.proto --python_out=.
This command converts all the "name".proto files to "name_pb2".py files. Next, move into the object_detection directory:
cd /home/pi/tensorflow1/models/research/object_detectionNow, we’ll download the SSD_Lite model from the TensorFlow detection model zoo. The model zoo is Google’s collection of pre-trained object detection models that have various levels of speed and accuracy. The Raspberry Pi has a weak processor, so we need to use a model that takes less processing power. Though the model will run faster, it comes at a tradeoff of having lower accuracy. For this tutorial, we’ll use SSDLite-MobileNet, which is the fastest model available.
Google is continuously releasing models with improved speed and performance, so check back at the model zoo often to see if there are any better models.
Download the SSDLite-MobileNet model and unpack it by issuing:
wget http://download.tensorflow.org/models/object_detection/ssdlite_mobilenet_v2_coco_2018_05_09.tar.gz

tar -xzvf ssdlite_mobilenet_v2_coco_2018_05_09.tar.gz
Now the model is in the object_detection directory and ready to be used.
6. Detect Objects!
Okay, now everything is set up for performing object detection on the Pi! The Python script in this repository, Object_detection_picamera.py, detects objects in live feeds from a Picamera or USB webcam. Basically, the script sets paths to the model and label map, loads the model into memory, initializes the Picamera, and then begins performing object detection on each video frame from the Picamera.
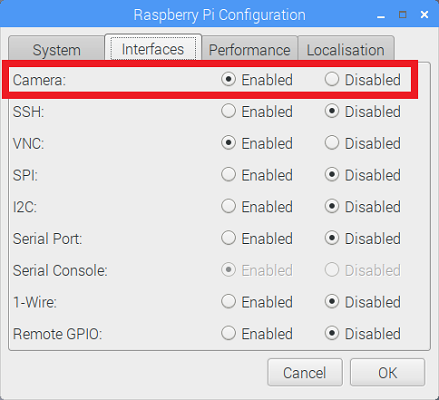
If you’re using a Picamera, make sure it is enabled in the Raspberry Pi configuration menu.
Download the Object_detection_picamera.py file into the object_detection directory by issuing:
wget https://raw.githubusercontent.com/EdjeElectronics/TensorFlow-Object-Detection-on-the-Raspberry-Pi/master/Object_detection_picamera.pyRun the script by issuing:
python3 Object_detection_picamera.pyThe script defaults to using an attached Picamera. If you have a USB webcam instead, add --usbcam to the end of the command:
python3 Object_detection_picamera.py --usbcamOnce the script initializes (which can take up to 30 seconds), you will see a window showing a live view from your camera. Common objects inside the view will be identified and have a rectangle drawn around them.
With the SSDLite model, the Raspberry Pi 3 performs fairly well, achieving a frame rate higher than 1FPS. This is fast enough for most real-time object detection applications.